How to properly tag Intercom Conversations
If you use Intercom, you might have seen a little tag label next to each message when you hover over it. If you ever clicked on it, you will know that it’s a feature that lets you tag conversations. In this post, I will give you three reasons why you should use it and how to do it properly.
What is conversation tagging?
Tagging is the process of assigning meaningful labels to your customer conversations in Intercom. By meaningful labels, I mean labels that specifically describe what the Intercom conversation is about — in essence, a brief one or two-word summary. These labels, otherwise known as tags, act as a reminder so that you can later remember the contents of the conversation, at a glance.
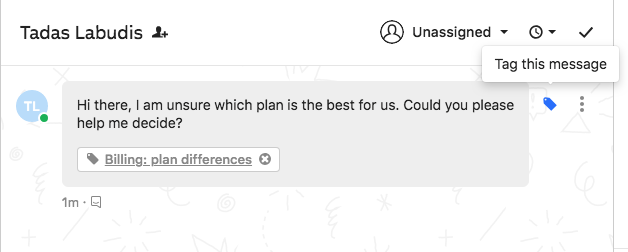
Tags also work as a tool for grouping multiple related conversations together, so that all the conversations about a specific topic are retrieved during a search. This way you see all relevant conversations together in one place.
The Benefits of Tagging
1. Find conversations more easily
I personally think it’s a huge waste of your valuable time to re-read hundreds of conversations until you find the ones that you are looking for. It’s much more effective to narrow your search to the exact conversations you need, right from the start.
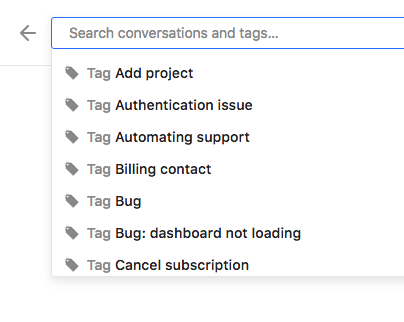
Tagging allows you to efficiently sort through your conversations and pull up only the ones related to a particular issue.
2. Drive product development with tag analytics
You can also use conversation tags to learn about your customers — their needs, requests, pain points and what they like or dislike about your product.
You can use your conversation tags to not only identify opportunities for improving your product but also to find those pesky product issues that frequently annoy your users and, by extension, your support team.
3. Decrease support costs
Let’s say your company is facing a surge in new customers/users and you can’t seem to hire support staff quickly enough or it isn’t financially feasible to expand your support team. You can use your Intercom customer conversation tags to analyse your tags and identify recurring support issues.
By addressing these recurring issues either by fixing them in the product or providing better customer education, fewer new customers will reach out to the support team with the same set of questions.
The result — lower support costs and a sane support team where the monotony of dealing with the same queries, again and again, is vanquished once and for all.
Conversation tagging in practice
Establishing a tagging framework
The first step in your tagging journey is to establish a tagging framework — a consistent set of tags which can summarise the contents of a customer’s conversation in a few words and can be easily understood by the members of your team.
Broad vs Specific Tags
There is some debate around how specific Intercom tags should be.
Broad tags make it easier to categorise conversations as you are dealing with a smaller tagging framework. However, the downside is that you are losing valuable context and detail. You will get a vague sense of the conversation topic but have to re-read the entire conversation to figure out the specifics.
Essentially, you are trading-off ease of use and specificity.
Recommended tag structure
I recommend tags that are assembled from two or three individual components, starting from an overarching category level and becoming more precise with each added component.
Tag = Category + Product Area + Issue
An example of a strong tag, following this structure: “Feature Request — Photos — Filters”.
Now let’s look at each individual component in more detail.
Category
The first component of our tag, also known as the ‘category’, refers to the most general umbrella term under which the conversation can be classified. The category component enables you to map high-level trends.
For example, if you run a software product, your categories could include:
- Bugs
- Usability Issues
- New Feature Requests
- User Education
- Finance
- Generic Negatives
- Generic Positives
Product Area
The second component of your tag introduces another layer of detail about the conversation — specifying the product area (feature, product or service) mentioned in the conversation.
For example, if your product is a photo sharing app, your product areas could include:
- Photos
- Sharing
- Albums
- Filters
- User Profile
Issue
The third component goes into further detail about the conversation’s contents — specifying the particular issue that was discussed in the conversation.
For example, if your user ran into an issue with photo uploading, you might choose to name it “Intermittent Uploading”.
Or if a user inquired about changing their name, you might call the issue “Name Changing”.
The combined tag
When you join the three components together, you get meaningful conversation tags such as:
- Bug — Photos — Intermittent Uploading
- User Education — User Profile — Name Changing
- Finance — Billing — Invoice Request
- Finance — Pricing — Too Expensive
- Usability Issue — Photos — Uploading
- Usability Issue — Albums — Deleting
Applying your tagging framework
Now that you know the theory behind setting up a tagging framework, it’s time to apply it in practice.
Step 1: Generate tags
A good way to come up with your initial tag set is to have a brainstorming session with members of your support, product, marketing and sales teams.
The goal is to agree on the language you are going to use for each component, as these are the basic building blocks for your tags.
Generally, a good place to start is by defining the broad categories that are in line with your business processes.
Then list all the product areas that concern your customers.
Finally, try to recall common issues that customers enquired or complained about recently and write them down. Reading through a few Intercom conversations will help jog your memory.
Step 2: Revise your existing Intercom tags
If you have already done some tagging prior to reading this post, you may want to consider revising your existing tags. Otherwise, skip to Step 3.
You can see all of your Intercom tags by opening Intercom Settings > Company Data > People and company tags. Please note that People, Company and Conversation tags are shared.
If you want to follow our tag framework when creating new tags, you want to adjust your old tags to maintain consistency. It’s also a good idea to delete any duplicate or redundant tags that you may find in the process.
Step 3: Create new Intercom tags
The most common way to create tags is through the Conversation view in Intercom. Go through a batch of closed customer conversations and create tags using our recommended three-part structure as you go.
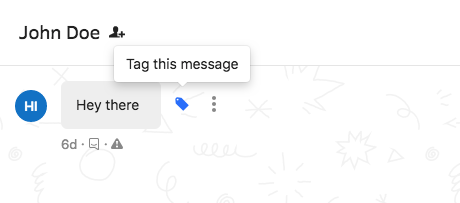
When in an open Intercom conversation, hover over a relevant message and click on the tag icon.
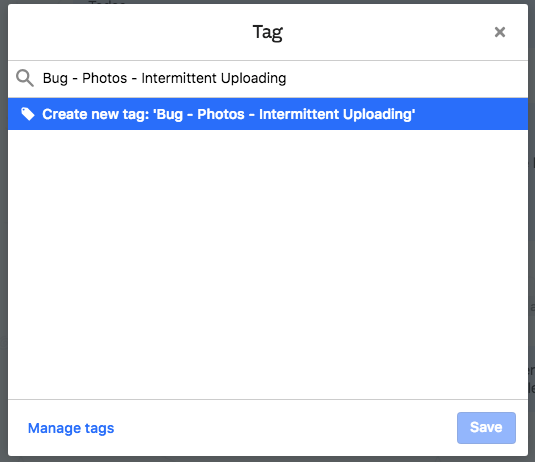
Then type in the relevant tag name in the search bar and click “Create new tag”. Confirm selection with “Save”.
Your tag will appear under the message.
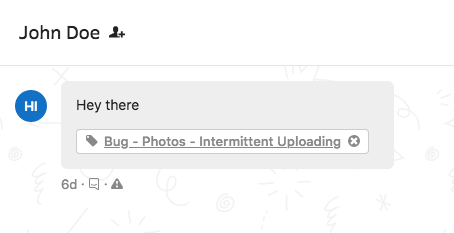
Repeat this process until you have covered a wide range of conversations with various tags.
Step 4: Document your tags
One thing to keep in mind when creating tags is consistency. It is essential that all tags are created by following a set process that includes a similar structure and precise terminology. Tagging consistency reduces bloat and makes understanding tags easy.
You don’t want to end up in a situation where each team member creates their own version of a tag, describing common issues, and therefore produces duplicate tags. That will make it very difficult to draw any insights from your tagging effort.
A powerful tool for encouraging tagging consistency is to create a shared document to record your tags, particularly the most frequently used ones. Each tag should have a brief explanation of its meaning.
This shared document keeps all team members that are involved in the tagging process on the same page. It also equips you with a database of tags that makes it easy to train new staff.
You can use my free template to generate and document your tags.
Step 5: Train your team
Once you implement a tag framework, the most difficult part of self-tagging is getting into the habit of tagging every single conversation.
Firstly, your support team needs to understand the value of tagging so that they are motivated to do it. You need to explain why tagging matters and the benefits of tagging and ensure your team is on board with the process.
Secondly, you will want to introduce your support team to the process of tagging and your “source of truth” tag document. Take your time to walk them through the main tags and the situations in which they should be used.
Finally, your team members should be confident in creating their own tags when new unique situations occur. Explain how the tags are structured so your team can create new tags without creating duplicates.
Special thanks to Pia-Maria Bododea for helping me write this post.
